Both personally and in a society, they're priceless. And when you lose them?
I just finished 'Life At The Bottom', by Theodore Dalrymple, a British doctor(mentioned here at Kevin's place). He covers quite well what happens when multi-culti, PC beliefs throw the standards of a society out in the name of being 'inclusive' and 'sensitive'. Then I found this and this at Tech Central Station. All covering, in Britain, how things have gone downhill.
I can't remember where I first heard it, somone said "Tell your kids they have no prospects and they'll live down to them"; I'd add "Tell them there is no better or worse way to live, and they'll find the worst". Read the articles if nothing else; read the book if you can get hold of it. They're all scary as hell. Youve read of the increasing crime problems in Britain? From what I've found out, from these sources and others, it's worse- apparently much worse- than the official numbers let on. We tried some of the 'let the minor crimes go, worry about the big stuff' in many cities in the 60's & 70's, and crime rates exploded; I remember the upset when it was announced that New York City PD would no longer show up to take reports on routine burglaries because there were too many of them and too much other crime to deal with. Well, in most cities they finally got their collective heads out of their butts and stopped that. Rudy Guliani became famous because he insisted on "I don't care how minor the crime, arrest and prosecute them!". The civil liberties weenies screamed- as expected- and the average citazen applauded- as expected- and crime- ALL crime- began dropping. Lesson learned, except to those so tied to 'we must cuddle all people, no matter what they do' types.
But in Britain, it seems that they took that attitude, kept it going and are now at the extremes. The doctor notes cases he's personally witnessed where police show up after- sometimes during- an assault, break up the fight, and then refuse to arrest the bad guy. He's a known bad guy, you see, he'll just do it again, we've got more important things to worry about. The other side of this is if you're an honest citazen, and you smack somebody attacking you, YOU they'll arrest and take to jail, and do their very best to put in prison.
Standards. Those abandoned, and those people growing up without them. Why bother to work when you're guaranteed a place to live and food to eat and medical treatment? Why care about anything except your own desires of the moment when you face very little chance of any real punishment? Why worry about taking care of kids you bring into the world when they're guaranteed those things? Of course, that means the sperm-donor 'fathers' walking out, and/or beating up the mother and kids when they are around, and so forth. Which means the kids grow up thinking that's the normal way to behave.
We've got much of the same trouble here. It hasn't reached the proportions of Britain, and I have hopes that we can reverse the trend. But it's very troubling to see, and more troubling to consider how many people think the system in Britain is just the thing that we need here. It's like they look at what's happening there, and in places where it's tried here, and either cannot see it or refuse to acknowledge it.
Mark Steyn had a column recently where he was criticizing the British government for the 'shoot to kill if in doubt' policy when dealing with bombing suspects. There are parts of the column I'd argue with, but not the one where he points out that while the British government now has the agents of the state permitted to kill if they think someone might be about to enter a tube station or whatever with a bomb, if someone breaks into your house and tries to knife you and you swat him with a cricket bat, those same agents of the state will put you in prison. It used to be the standard in Britain that you had the God-given right to protect yourself and your family- and your HOME- with whatever force necessary, but that standard is gone.
Standards like 'if your kid misbehaves in school, you punish him for it; and you don't gripe at the school for punishing him'. That's been replaced by parents- using the term loosely- screaming at and threatening teachers for daring to fail a kid on a test, or for daring to tell the parent in a conference that the kid's in trouble now and it'll get worse if he doesn't straighten up. I've a friend who's a teacher, I've heard these stories firsthand as well as from the news. There was a kid in my daughters' first grade class who had 'developmental problems'; this was a polite way of saying he hit other kids, disrupted class, hit the teachers, and so forth. The parents threw a fit every time he was sent to the office: they knew he had a problem but didn't want him 'damaged' by being put in a special ed class, he deserved to be in a regular class and they'd SUE if you suggested otherwise! And the principal, and standard-issue bureaucrat, kept suspending the kid for a couple of days and then letting him back into the class. So the kid got to keep hurting other kids and keeping the teacher from possibly teaching the other kids, and that kid did not get the help he needed. All because the parents cared more about his tender feelings(can you say 'self-esteem? I knew you could) than about actually dealing with his problem. Their standards no longer included 'if your kid has a problem, get him in a class where he'll get the help he'll need' because it might stigmatize him, you see; much better to let him screw up a whole class than have his God-damned self-esteem troubled.
Standards like you don't let your pre-teen or teen daughter go out dressed and made-up like a cheap hooker because "that's the FASHION, don't you understand?!?" Standards like if your kid isn't doing well in school you find out why and try to fix it, not run to the school and blame the teacher for being mean/bigoted/whatever for daring to bring this up.
I wrote once before that I was split in my thoughts on some of my kid's friends when they were growing up. On the one hand they were really messing up their lives, and on the other they made such a fine bad example: "Yeah, So-and-So dresses and acts like that; remember what happened to them?" That's a damned expensive example; expensive to those kids directly, and expensive to other kids who thought that was cool and didn't get slapped down from acting the same.
Standards like an adult does not go out in public wearing a shirt with obscene words on it, or obscene suggestions. Standards like, if you're an adult, ACT LIKE ONE!
I do not think we should revert in all ways to the 'Father Knows Best' attitudes of earlier days, but in some damned important ways we should. We'd all be better off.
Saturday, July 30, 2005
Thursday, July 28, 2005
Microlon followup 4
128 miles, 2.8 gallons, 45 mpg. I think this would have been a bit better if not for some circumstances I won't go into right now. Overall, seems to be sitting(with this one corrected) at 47mpg, two above past norms. So far, so good.
Forging, part 2
When last I wrote of this, you had the blade rough-forged to shape, and now have to take care of the ricasso, and shape the tang.
Most modern knives have the edge end before the blade meets the guard; in most old knives, continuing up into the 1800's, the edge came all the way back. If you want the ricasso to have a squared-off or rounded section before the guard, have the edge run back a little further than the point you want it to end, then make sure the area you want for the ricasso is square with the blade shape- not bent up or down. Remember, leave it a little big in all dimensions, especially to the rear.
Now comes the tang. If you want a full tang- as wide and long as the grips, which will be riveted or pinned on- it's fairly simple. Mark off a touch shorter than you want the tang to be and cut the piece off, then into the fire with that end. Unless your blade is quite long, you'll need tongs to hold onto the piece at this point. Bring the tang section up to heat and hammer it out. At this point do two things; leave it oversize in width and length, and taper it a bit in thickness. A tapered tang is just as strong, and a lot lighter.
If you want a narrow or 'stick' tang, you will need something like this:

That piece on top of the anvil is a spring fuller. A fuller is a piece, often looking like a straight-peen hammer, used to shape a notch in steel. Often they're used as a set; the top fuller has a handle, the bottom fits into the hardy hole(the square one on the anvil face), and a hot piece is set between them to narrow it at that point. Obviously you need help to do it that way, so you can make one like this to do it alone. This is just a piece of coil spring from a truck suspension. Straighten out about two feet of it; flatten and bend one end into a 'U' to fit snugly into the hardy hole; flatten a section in the center and bend it over, leaving about an inch between the two round sections. To use it, you heat the area you wish to shape, slide it between the two round arms, and swat it right above the stock with a fairly heavy hammer. With a light piece you can use a lighter hammer, with a piece of thick stock you'll need more energy in the stroke. If the blade is very wide you put it in sideways, then turn it vertical. Pick a spot a little further back than you want the tang to begin(you can always grind up to the line), mark it if need be, heat it, put it in place and strike. Do one or two strokes, then flip the piece over and hit one or two from the other side; again, stop when the notches leave the stock a little wider than the finished tang will be. Now you can put the tang section back to heat, remove the fuller, and work out the tang.
Set the piece with the tang section on the anvil face and the notch at the edge, and hammer it along the length of the section; turn over and work the other side. That'll narrow and thicken it, so the next heat you work the sides, to thin and stretch the tang. Alternate sides to keep it even, and make the tang longer than needed. If you have a straight-peen hammer(cross-peen will do, straight is easier for me), you can use it like this: use the peen side and hammer a set of parallel notches in the piece, then flip it over and do the same, then flip back and flatten with the regular face. This will stretch the piece a lot faster, but if you don't watch it you can wind up making it thinner than you planned; it takes practice.
When the tang is forged, look at the piece from all angles. Is it straight? Is it twisted anywhere along its' length? Is the edge centered? If you spot a problem, correct it now, striking- or bending or twisting- just hard enough. When all is ready, there's a last step I'd recommend, called packing.
Supposedly this can refine the structure of the steel, making a better blade; I have noticed that if I do it right, it does seem to make a difference. Without that factor, it does smooth and even up the surface. In any case, take a hammer with a smooth face- not flat, just slightly rounded and as wide as you have-, bring as much of the blade as possible up to a low red heat, lay it on the anvil face with the flat of one side on the face, and start hammering with light, fast blows. Remember, this is not to shape, this is to refine, so control yourself. After it cools to a dark red, heat it back up and do the same on the other side, and try to use the same number of blows(roughly) and cover the same area as the first heat. If you need to heat a long blade in sections, no problem, just keep it even.
When you're done with this, back to the fire. This time you need to get the whole blade, or as much of it as you can, to a low red heat, as evenly over the length as possible. When it's there, take it out and let it cool in the air. I'll often clamp the tang in a vise and let it sit if it's a big one. When it's dark, do it again. I generally go for three annealing heats like this, the purpose of which is to even out stresses from hammering and, if you got it a bit too hot in earlier stages, will help keep the grain size of the steel where it should be. After the third heat, clamp it in the vise or set it somewhere safe and let it cool down completely.
The forging is done at this point. Next comes grinding, then heat-treating, then polishing.
Wednesday, July 27, 2005
Mr. Completely has OBVIOUSLY been drinking,
look at the spelling:
"In case you missed it I tagged you for the "What do you have on your Night
Stand" meme. Do you really keep a Scoytish Broad Sword next to the bed?"
'Scoytish'?, for God's sake?
Oh well, let's see... a lamp, a Surefire flashlight, a watch and sometimes something to drink on the table. By the bed... three, no, four books, David Drake, James Doss, Glen Cook and Rex Stout. No, there's not a broadsword, that's a little too tight quarters for that. There IS something sharp, and something noisy, just in case.
Assuming he's so hard up for reading that he comes by, I nominate the gentleman from mASS BACKWARDS. Due to living in the People's Republic of Maryland he doesn't have a noisemaker, but what else do you have there, dude?
And I'll try to get the next 'forging' installment in tomorrow.
Tuesday, July 26, 2005
Range report
I had a chance to try out a couple of firearms I've never worked with before; I had originally planned to shoot them next week, but as the last couple of days have not gone real well, it got done today(yeah, I know, lousy English).
First, the Savage 340 Series E
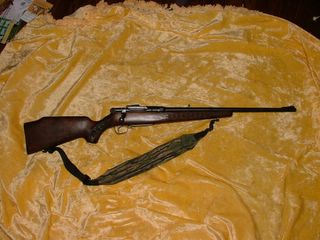
This is a bolt action repeater made, in this case, in .30-30 Winchester. There were very few bolt rifles made in this cartridge, and I'd rarely seen one of these. Barrel is 22 inches, it has a bead front and folding rear with a notch. It's light and handy, it'd work nicely in the woods. Trigger was light, I'd guess about 3-4 lbs, with a little creep.
One of the strange things about this is the magazine. Instead of a staggered-cartridge design it's a straight, like the Mosin Nagant. This one hold three cartridges; any more and the mag would stick out from the receiver bottom. And it's damn near impossible to load it from the top, you have to drop the mag to load. You can load single rounds, but you can't just drop it in and close the bolt, you have to push it into the chamber and then close, and with a flat-nose bullet it can be a bit of a pain.
Good things are, as mentioned, it's light and handy, and since you don't have to worry about a cartridge nose hitting the primer ahead of it in the magazine, you can load it with pointed bullets. What I had today was some cast-bullet loads I made up for practice with a Winchester 94, it's a 150-grain RCBS flatnose bullet with a gas check. If you're not familiar with this, on a gas-check bullet the base is slightly smaller diameter than the rest of the bullet body, and a copper cup is locked on. With lead bullets there are definate limits to how fast you can push them without badly fouling the bore; with a gas check on the base, you can drive them faster without a big mess to clean up. This load, if I remember correctly, drives the bullet about 1500fps, and is fairly accurate in my 94(I've also used this bullet in practice ammo for a .308, it's very versitile). So I tried it out, and got a pleasant surprise; very good accuracy out of this rifle. I'd started off at 50 yards, and then went to 100. My last five shots are below:

Overall group size is 2 3/8", with three within 3/4". That's accuracy that would put meat on the table at that range, and it's possible that with better sights- or a scope- that overall would tighten up nicely. Overall, it's a good rifle I wouldn't mind having. I've always liked the .30-30, and think a double-barrel in this cartridge would make a fine deer rifle in many areas. Maybe someday, if I win the lottery...
The other to try out is an odd beast, the Nagant Revolver

This thing fires a 7.62mm bullet(actual diameter about .311 I think) out of one of the stranger cartridges I've seen:
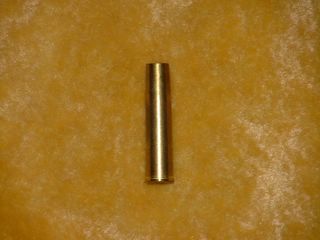
It's 1.5" long, and the bullet is seated way down inside the case(this is some Russian target ammo from SOG). When you cock the hammer, not only does the cylinder rotate, at the end it cams forward so the end of the case actually sits inside the forcing cone. When you fire, the case seals so you have no flash, and no pressure loss, between cylinder and bore. This makes this thing the only revolver I know of that will actually work very well with a silencer.
This one is a double-action, from what I've read they were also made single-action and double-action only. And it has what a friend once described as the 'trigger pull from Hell'. Single-action is not too bad, heavy but it breaks cleanly. Double-action is awful; heavy and it stacks toward the end. Sights are a tapered front post and a notch rear, though there are some target models with adjustable sights on the market.
I shot this one at ten yards, and was pleasantly surprised with the accuracy. Single-action fire gave nice tight groups(this ammo is a hollow-base wadcutter) as long as you could work the heavy trigger. The thing has a heavy V mainspring, and if you had one to work on you might be able to lighten the spring a bit to improve the trigger, but I don't know that for certain, it's just a guess.
Ammo for this is either the Russian stuff shot today($15 for 40 rounds), Fiocci($25 to $30 for 50!) or handload. Starfire now makes brass for this cartridge, and RCBS has dies. Lee makes a die set to load ammo using .32-20 brass; from what I've read it works pretty well. This case isn't long enough to give the gas seal, but it's a lot less expensive than factory ammo and from what I've read, with the right bullet gives good results.
I'd like to have one of these because of the history of them, and the unique action. It's a Belgian design, selected by the Czar's army in Russia, and stayed in use clear through WWII.
Overall a much nicer day than I'd expected it to be when I woke up.
First, the Savage 340 Series E

This is a bolt action repeater made, in this case, in .30-30 Winchester. There were very few bolt rifles made in this cartridge, and I'd rarely seen one of these. Barrel is 22 inches, it has a bead front and folding rear with a notch. It's light and handy, it'd work nicely in the woods. Trigger was light, I'd guess about 3-4 lbs, with a little creep.
One of the strange things about this is the magazine. Instead of a staggered-cartridge design it's a straight, like the Mosin Nagant. This one hold three cartridges; any more and the mag would stick out from the receiver bottom. And it's damn near impossible to load it from the top, you have to drop the mag to load. You can load single rounds, but you can't just drop it in and close the bolt, you have to push it into the chamber and then close, and with a flat-nose bullet it can be a bit of a pain.
Good things are, as mentioned, it's light and handy, and since you don't have to worry about a cartridge nose hitting the primer ahead of it in the magazine, you can load it with pointed bullets. What I had today was some cast-bullet loads I made up for practice with a Winchester 94, it's a 150-grain RCBS flatnose bullet with a gas check. If you're not familiar with this, on a gas-check bullet the base is slightly smaller diameter than the rest of the bullet body, and a copper cup is locked on. With lead bullets there are definate limits to how fast you can push them without badly fouling the bore; with a gas check on the base, you can drive them faster without a big mess to clean up. This load, if I remember correctly, drives the bullet about 1500fps, and is fairly accurate in my 94(I've also used this bullet in practice ammo for a .308, it's very versitile). So I tried it out, and got a pleasant surprise; very good accuracy out of this rifle. I'd started off at 50 yards, and then went to 100. My last five shots are below:
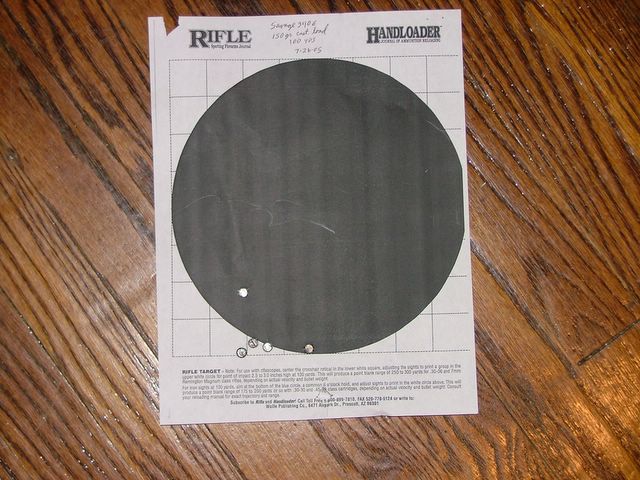
Overall group size is 2 3/8", with three within 3/4". That's accuracy that would put meat on the table at that range, and it's possible that with better sights- or a scope- that overall would tighten up nicely. Overall, it's a good rifle I wouldn't mind having. I've always liked the .30-30, and think a double-barrel in this cartridge would make a fine deer rifle in many areas. Maybe someday, if I win the lottery...
The other to try out is an odd beast, the Nagant Revolver

This thing fires a 7.62mm bullet(actual diameter about .311 I think) out of one of the stranger cartridges I've seen:

It's 1.5" long, and the bullet is seated way down inside the case(this is some Russian target ammo from SOG). When you cock the hammer, not only does the cylinder rotate, at the end it cams forward so the end of the case actually sits inside the forcing cone. When you fire, the case seals so you have no flash, and no pressure loss, between cylinder and bore. This makes this thing the only revolver I know of that will actually work very well with a silencer.
This one is a double-action, from what I've read they were also made single-action and double-action only. And it has what a friend once described as the 'trigger pull from Hell'. Single-action is not too bad, heavy but it breaks cleanly. Double-action is awful; heavy and it stacks toward the end. Sights are a tapered front post and a notch rear, though there are some target models with adjustable sights on the market.
I shot this one at ten yards, and was pleasantly surprised with the accuracy. Single-action fire gave nice tight groups(this ammo is a hollow-base wadcutter) as long as you could work the heavy trigger. The thing has a heavy V mainspring, and if you had one to work on you might be able to lighten the spring a bit to improve the trigger, but I don't know that for certain, it's just a guess.
Ammo for this is either the Russian stuff shot today($15 for 40 rounds), Fiocci($25 to $30 for 50!) or handload. Starfire now makes brass for this cartridge, and RCBS has dies. Lee makes a die set to load ammo using .32-20 brass; from what I've read it works pretty well. This case isn't long enough to give the gas seal, but it's a lot less expensive than factory ammo and from what I've read, with the right bullet gives good results.
I'd like to have one of these because of the history of them, and the unique action. It's a Belgian design, selected by the Czar's army in Russia, and stayed in use clear through WWII.
Overall a much nicer day than I'd expected it to be when I woke up.
Sunday, July 24, 2005
Forging, part 1
I thought I'd go through the process, and my favorite thing to make being blades, I'll focus on that this time.
This may sound silly, but before you start, decide just what it is you're going to make. Not just 'a knife', but details: how long a blade, how wide, what shape, what kind of tang and how long? That affects not only the making, but also the choice of steel. What I'd choose for a big, heavy-cutting type of blade isn't what I'd choose for a smaller general-purpose type. It also affects how big a fire you need; you only work a section at a time, until near the end, but a big knife will, obviously, start out with bigger stock and need more heat.
That decided, the steel in hand, light off the forge, let it burn a few minutes to clean out the fire, then put the first section in to heat. While it's heating make sure the tongs are handy(if needed), the hammers you'll need are handy, and any other tools- such as a fuller to narrow the blade at the tang- haven't wandered off to hide..
If you're starting with round bar stock, the first thing you do is flatten it, wide and thick enough to shape the blade. Again, a section at a time; unless you have a really big forge, about 6" is as much as you can heat at this stage. DO NOT hammer the stock too thin; leave it thicker than you need, as you can always thin it a bit more later. And, unless you want to leave hammer marks in the finished piece, you'll want to leave it a bit thick at the end, so you have enough mass to grind away the forge marks.
Ok, you've worked your way down, and have about 12" of the bar flattened out. I'll generally leave it attached to the main bar 'till near the end; holding onto the bar is generally more secure than using tongs. Now you shape the point.
Let's say you're making a bowie-style blade with a straight clip point like this one. You start off by heating the squared-off end and forging it down so that it tapers from the back of the blade to the edge, not the other way around(reason to come). You'll have to hammer the sides to keep the thickness even as you go, and you should wind up with a bar with a straight angle from a few inches back from the end down to the point. It may take several heats, depending on thickness/width/type of steel, just try to get it done with the least number possible. Every time you bring a piece up to red heat, you lose some metal from the hot surface combining with oxygen in the air and forming scale that falls off as you hammer.
Now, if you haven't already, decide how long you intend the blade to be from point to end of cutting edge, and either keep a steel ruler handy or mark it with soapstone or something. And now you can start forging in the bevels, the angles from the back of the blade to the edge.
Start at the point, and this is why you wanted to taper the end from the back down toward the edge. Bring a section up to heat, place it on the anvil face with the edge along one edge of the face, and start hammering. I use a 4lb. hammer with a nicely rounded face for this(not applicable all users, your results may vary), and start from the point and work my way back. This gets tricky because you don't want the hammer to be coming down squarely on the stock, you want it to come down at a bit of an angle, so the strike is thinning the edge and leaving further back thick. This does two things; first, it gives the blade a nice taper from back to edge and second, it stretches the edge further than the rest. This causes the point to curve back up, and with experience you can, by working the edge and the clip section of the back, adjust the shape so the point will be exactly where you want it. It can be amazing how much the point will move as you shape the bevels, in some blades I will shape the point as described above, then hammer it over the horn so it droops down below the edge; that way, when I shape the bevels of some shapes I don't wind up having to hammer the point back down because it's become too high.
Work this side, then put it back into the fire, get it up to heat, and then work the other side of the blade in the same area, preferably with roughly the same number of strokes(it helps keep things even). Then turn it edge up and look at it closely. The edge should be centered along the length you've worked so far; if it's not, even it up now. This works much better than doing the whole length and then trying to straighten it all- especially on long blades. Trust me.
When this is all as you want it- smooth taper from back to edge, point where you want it, move back to the next section, heat it and hammer. Two things to remember here: first, in a long blade you may have to give much of the blade a downward curve before you start hammering the bevels in, with a long blade it can be amazing how much the blade will curve up as you shape the bevels; second, remember to leave it thicker than you want the finished piece to be. Not only do you want to be able(generally speaking) to have enough stock to grind & polish out the forge marks, but by leaving it a bit thick, the finish grinding after heat treating will remove the surface steel that lost carbon to the fire. So work your way back to the point where the edge will end, and at that point you'll need to shape the ricasso- the area where the blade body meets the tang- and the tang. That'll be part two.
Subscribe to:
Posts (Atom)